STANMECH Technologies Inc.
  • Home
  • Equipment Supply
    • Flooring
    • Geomembrane
    • Industrial Fabrics
    • Manufacturing
    • Plastic Fabrication
    • Roofing >
      • Distributors
  • Engineering Services
    • Engineering Services
    • Cosmetics
    • Deflashing Systems
    • Drying Bottles & Cans
    • Heat Systems
    • Shrinking Labels
  • Repair
    • Repair Service
    • Tech Tips
  • Resources
    • Articles
    • Case Studies
    • Engineering Information
    • Whitepapers
  • About
    • About Us
    • Technology Providers
  • Contact

Welding Acrylic Fabric with the UNIPLAN and De-reeler

8/18/2016


Items Required:

  • UNIPLAN E automatic welder
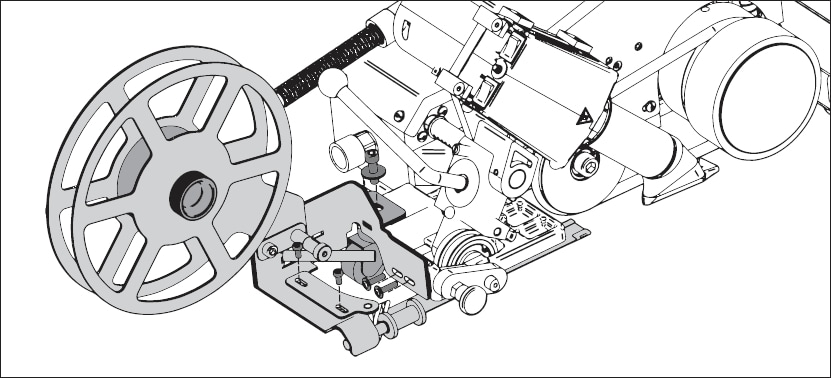
  • De-reeler accessory
  • Heat activated adhesive tape
  • 2 pieces of acrylic fabric (e.g., Sunbrella)
Picture

Procedure:

  1. Install the de-reeler onto the UNIPLAN and the 3M adhesive tape onto the de-reeler spool. A copy of the installation instructions can be found here and are included with purchase of the de-reeler.  

  2. Lay out the material to be welded. Place the two pieces one on top of the other, face side together aligning the edge to be welded. Secure both pieces of material with tape or weights to prevent movement during welding. 

  3. Use the trolley lever to raise the UNIPLAN and position the tool. The body of the UNIPLAN should be on top of the fabric with the nozzle positioned so it can swing down and under at the edge of the fabric. The de-reeler arm should be positioned between the two pieces of fabric.

  4. Run the adhesive tape through the de-reeler under the drive wheel of the UNIPLAN, pull the tape through at least 6 to 8 inches passed the drive wheel. This should sandwich the adhesive tape between the two pieces of acrylic fabric. 

  5. Lower the UNIPLAN (using the trolley lever) making sure both the UNIPLAN’s drive and guide rollers are properly aligned along the edge of the material. 

  6. Turn on the UNIPLAN. 

  7. Set the proper temperature, speed, and airflow parameters according to the adhesive tape type and thickness of acrylic. This step will require experimentation and testing to determine the correct settings. See our article on Choosing Welding Parameters for more details. 

  8. Move the welding nozzle down and slide inward completely under all three pieces of acrylic and adhesive tape. This will activate the drive of the UNIPLAN. 

  9. As the UNIPLAN starts moving carefully guide it along the welding seam making sure all edges of acrylic fabric and adhesive tape are in line with the drive and front guide wheels. 
    ​
  10. After completion inspect the weld by performing a tear test. If the weld is not satisfactory adjust the parameters accordingly and repeat the procedure.
 
For more information on the general operation of the UNIPLAN E see our article.
 
Interested in welding acrylic fabric or have some questions? Give us a call at 1-888-438-6324 or email info@stanmech.com. 

Comments are closed.

    Index by Industry

    Flooring Installation
    Geomembrane Welding
    Industrial Fabrics Welding
    Manufacturing
    Plastic Fabrication
    Roofing

    Browse Newest

    All
    Engineering Services
    Flooring Installation
    Geomembrane Welding
    Industrial Fabrics Welding
    Manufacturing
    Plastic Fabrication
    Roofing
    Video

      Comments & Questions

    Submit
STANMECH Technologies Inc. 
​944 Zelco Drive Burlington ON L7L 4Y3 | 1-888-438-6324 | info@stanmech.com
Terms of Use    Privacy    Terms and Conditions of Sale    Warranty Policies 
Français

Proud Member of:
IFAI Logo
Industrial Fabrics Association International
IAGI Logo
International Association of Geosynthetic Installers
PEO Logo
Authorized by the Association of Professional Engineers of Ontario to offer professional engineering services. 
  • Home
  • Equipment Supply
    • Flooring
    • Geomembrane
    • Industrial Fabrics
    • Manufacturing
    • Plastic Fabrication
    • Roofing >
      • Distributors
  • Engineering Services
    • Engineering Services
    • Cosmetics
    • Deflashing Systems
    • Drying Bottles & Cans
    • Heat Systems
    • Shrinking Labels
  • Repair
    • Repair Service
    • Tech Tips
  • Resources
    • Articles
    • Case Studies
    • Engineering Information
    • Whitepapers
  • About
    • About Us
    • Technology Providers
  • Contact