STANMECH Technologies Inc.
  • Home
  • Equipment Supply
    • Flooring
    • Geomembrane
    • Industrial Fabrics
    • Manufacturing
    • Plastic Fabrication
    • Roofing >
      • Distributors
  • Design Services
    • Design Services
    • Cosmetics
    • Deflashing Systems
    • Drying Bottles & Cans
    • Process Heat Systems
    • Shrinking Labels
  • Repair
    • Repair Service
    • Tech Tips
  • Resources
    • Articles
    • Case Studies
    • System Design Calculations
    • Whitepapers
  • About
    • About Us
    • Technology Providers
  • Contact

Welding Industrial Fabrics with the UNIPLAN E

8/25/2015

 
Picture

Weld Prep

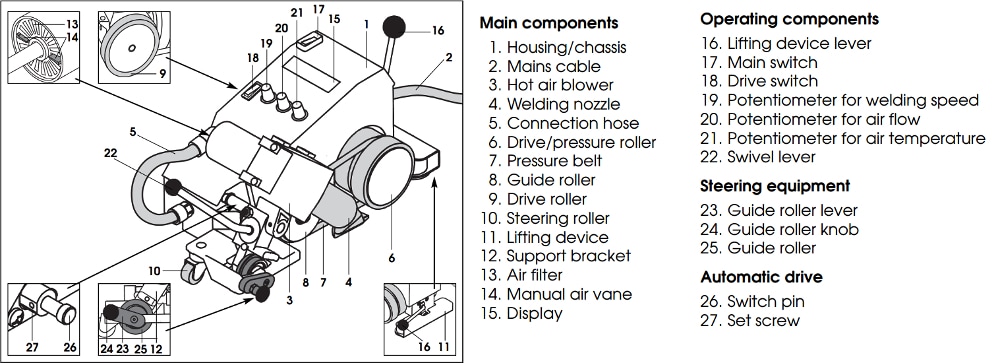
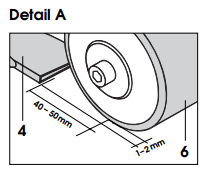
Before beginning to weld, you must check the nozzle position and move the tool into place. This ensures a straight, high quality weld.
  1. Check nozzle position: The forward edge of the nozzle should be 40-50 mm from where the pressure roller makes contact with the fabric. The outside edge of the nozzle should be 1-2 mm from the outside edge of the pressure roller. See ‘Detail A’ image.
  2. Position tool:
    1. Swivel hot air blower (3) up using lever (22).
    2. Use trolley lever (16) to raise tool off pressure and drive rollers (6 & 9).
    3. Use guide roller lever (23) to engage or disengage guide roller (25) depending on application. See ‘Detail B’ and ‘Detail C’. The guide roller ensures the UNIPLAN welds in a straight line following the edge of the upper piece of material. When welding straight runs, engage the guide roller. When welding along a curve, disengage the guide roller.
    4. Position the UNIPLAN over the material at the beginning of the weld. The outside edge of the pressure roller (6) and guide roller (25) should line up with the overlap edge of the material.
    5. Use trolley lever (16) to lower machine into position.

Welding

Picture
  1. Plug the tool in and switch on using the main switch (17). The hot air blower (3) will start automatically.
  2. Set your welding parameters using knobs 19, 20, and 21. These correspond to Speed, Air Volume, and Temperature.
    1. Make sure to do some test welds to find the appropriate parameters before beginning the job. Each fabric has more than one set of parameters that produce a good weld. Generally, speed can be increased as temperature is increased, up to a point. Decreasing air flow can help prevent flutter in thin fabrics.
  3. Swivel the hot air blower (3) into place using the lever (22) to start the machine. The welding nozzle (4) should be placed between the two layers of material.
    1. If necessary, the tool can be started manually using the drive switch (18).
  4. When welding is complete, use the lever (22) to swing the hot air blower (3) out and up. This will stop the machine from moving.
  5. Before shutting off power to the machine, set the air temperature to zero using the potentiometer (21) and allow the machine to run without heat for several minutes until the Temperature ACTUAL-value on the display (15) is close to ambient temperature.
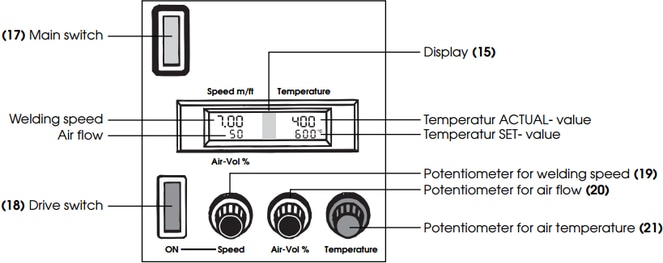
Still have questions? Contact your technical sales representative for help. ​

Comments are closed.

    Index by Industry

    Flooring Installation
    Geomembrane Welding
    Industrial Fabrics Welding
    Manufacturing
    Plastic Fabrication
    Roofing

    Browse Newest

    All
    Flooring Installation
    Geomembrane Welding
    Industrial Fabrics Welding
    Manufacturing
    Plastic Fabrication
    Roofing

      Comments & Questions

    Submit
STANMECH Technologies Inc. 
​944 Zelco Drive Burlington ON L7L 4Y3 | 1-888-438-6324 | [email protected]
Terms of Use    Privacy    Terms and Conditions of Sale    Warranty Policies 
Français

Proud Member of:
IAGI Logo
International Association of Geosynthetic Installers
  • Home
  • Equipment Supply
    • Flooring
    • Geomembrane
    • Industrial Fabrics
    • Manufacturing
    • Plastic Fabrication
    • Roofing >
      • Distributors
  • Design Services
    • Design Services
    • Cosmetics
    • Deflashing Systems
    • Drying Bottles & Cans
    • Process Heat Systems
    • Shrinking Labels
  • Repair
    • Repair Service
    • Tech Tips
  • Resources
    • Articles
    • Case Studies
    • System Design Calculations
    • Whitepapers
  • About
    • About Us
    • Technology Providers
  • Contact