|
Plug specifications:
When installing a plug:
Making an Extension Cord:
Generator Instructions:
Plug specifications:
When installing a plug:
Making an Extension Cord:
Generator Instructions:
Plug specifications:
When installing a plug:
Making an Extension Cord:
Generator Instructions:
Plug specifications:
When installing a plug:
Making an Extension Cord:
Generator Instructions:
Plug specifications: 120 Volt; 20+ Amp; 2-pole; 3-wire; grounding; twist-lock Example: Hubbell HBL2311 plug
When installing a plug:
Making an Extension Cord:
Generator Instructions:
Cleaning the welding shoe of an extrusion welder is an important step when stopping work for the day or any extended period of time.
When installing a plug on to a power cord:
Ensure your tool is completely cooled down before shutting off:
If a tool's heater tube gets wet:
Symptom: The VARIMAT does not start driving when the ELECTRON is placed in the weld position, or it starts briefly and then stops driving.
Symptom: The VARIMAT suddenly turns off and on, or does not turn on at all
Symptom: Temperature is not steady, it floats up and down
Symptom: The VARIMAT V displays the desired temperature but fails to reach the desired temperature
Symptom: Bad tracking, membrane burns, folds
The lock pin may snap if shock or extreme pressure is put upon the ELECTRON blower while it is locked in the upper position.
The two hold-down assemblies and the green belt in the picture below keep the top layer of membrane flat on the bottom layer as it is heated by the nozzle, just before the drive tire presses down on it.
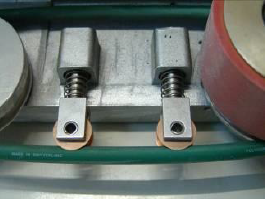
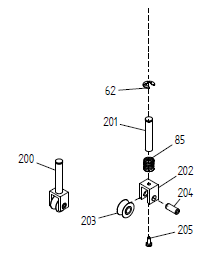
Each hold-down assembly contains the following parts:
If your Variant T1 stops driving while welding, check that the heater locks correctly into the welding position.
How the Weld Position Locking Mechanism Works
After allowing the tool to cool down completely. Slide the heater all the way to the right/outside of the tool. Note that you can now see a groove in the guide shaft.
In the picture below, a small flat screw driver is being held against a ball bearing set screw. 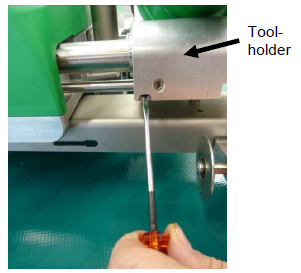
|

|
STANMECH Technologies Inc.
944 Zelco Drive Burlington ON L7L 4Y3 | 1-888-438-6324 | info@stanmech.com Terms of Use Privacy Terms and Conditions of Sale Warranty Policies |
|
Proud Member of: