STANMECH Technologies Inc.
  • Home
  • Equipment Supply
    • Flooring
    • Geomembrane
    • Industrial Fabrics
    • Manufacturing
    • Plastic Fabrication
    • Roofing >
      • Distributors
  • Engineering Services
    • Engineering Services
    • Cosmetics
    • Deflashing Systems
    • Drying Bottles & Cans
    • Heat Systems
    • Shrinking Labels
  • Repair
    • Repair Service
    • Tech Tips
  • Resources
    • Articles
    • Case Studies
    • Engineering Information
    • Whitepapers
  • About
    • About Us
    • Technology Providers
  • Contact

How to Change a TRIAC Hand Tool Element

4/16/2017

 
Picture
  • If tool is on, turn down heat and allow to cool fully
  • Ensure the TRIAC is unplugged 
Picture
  • Unscrew the four screws of the heater tube with a flat screw driver or a T20 torx bit

Picture
  • Carefully slide the heater tube, mica tube, and gasket off leaving the element attached to the tool; set removed items aside. Inspect the mica tube - if it is flaking or curling replace it.
  • On some models (e.g., TRIAC PID, TRIAC AT) there is a thermocouple, it will look like a thin silver wire running through the center of the element. The thermocouple must be handled gently or the outer shield or internal wires will break. If needed, gently bend the thermocouple straight while looking at it from the end. Rock the element from side to side gently to work the two pins of the element out of its socket without bending the thermocouple. If the element gets stuck behind the thermocouple, gently put the element back in its socket and try again to straighten the thermocouple. If the element cannot be removed without risking damage to the thermocouple, reassemble the tool and send it to STANMECH for service.
  • If there is no thermocouple (e.g., TRIAC S, TRIAC ST), remove the element by pulling it straight out of the tool; do not twist. 
Picture
  • Install the new element
  • Be careful not to bend the thermocouple if present
  • Be sure to purchase the same part number element, some elements look identical but are in fact different. The element’s part number can be found printed on its white base. 
Picture
  • Put the gasket, mica tube, and heater tube over the new element
Picture
  • Tighten the four screws to complete the installation
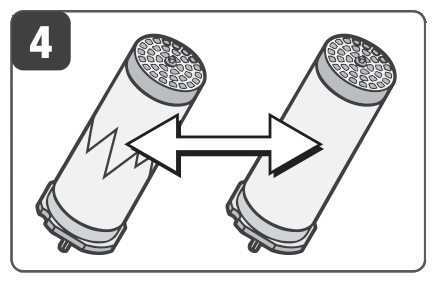
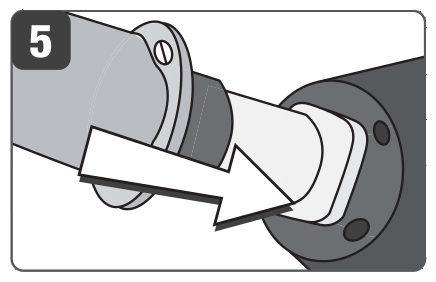
Look at the old element for signs of premature failure.
  • With a light behind it, look through the element to see if it is plugged. If so,
    • Check the new element from time to time and blow it out from front to back to keep it from plugging
    • Before laying the tool down while it is running, wipe the bench surface clean so that small particles are not sucked in
  • If the ceramic is cracked in small pieces, the element was heated while wet. If tool gets wet, run the TRIAC cold for 10 minutes and then at low heat for 5 minutes to dry it safely.
  • Make sure that the TRIAC has cooled down before it is shut off, every time it is used.
 
Have questions? Contact us at info@stanmech.com or 905-631-6161 for help. ​

Comments are closed.
STANMECH Technologies Inc. 
​944 Zelco Drive Burlington ON L7L 4Y3 | 1-888-438-6324 | info@stanmech.com
Terms of Use    Privacy    Terms and Conditions of Sale    Warranty Policies 
Français

Proud Member of:
IFAI Logo
Industrial Fabrics Association International
IAGI Logo
International Association of Geosynthetic Installers
PEO Logo
Authorized by the Association of Professional Engineers of Ontario to offer professional engineering services. 
  • Home
  • Equipment Supply
    • Flooring
    • Geomembrane
    • Industrial Fabrics
    • Manufacturing
    • Plastic Fabrication
    • Roofing >
      • Distributors
  • Engineering Services
    • Engineering Services
    • Cosmetics
    • Deflashing Systems
    • Drying Bottles & Cans
    • Heat Systems
    • Shrinking Labels
  • Repair
    • Repair Service
    • Tech Tips
  • Resources
    • Articles
    • Case Studies
    • Engineering Information
    • Whitepapers
  • About
    • About Us
    • Technology Providers
  • Contact