|
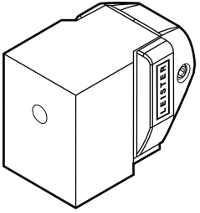
This initial operation video shows you—in an easy and simple way—how to set up a Leister FUSION extrusion welder. The video also demonstrates how to maintain the machine in a few steps, as well as safe and secure handling of the machine.
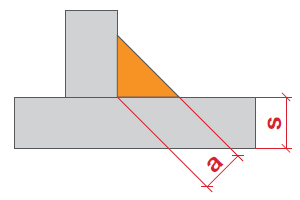
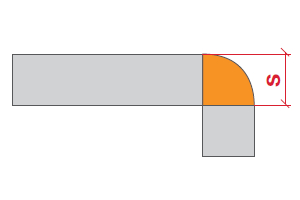
Using an extrusion welder to complete your fabrication project but not sure which shoe you need? Use our chart below to identify the type of welding shoe you need:
Like metal welding, plastic welding requires training and experience to become proficient. If the plastic welding procedure is not exactly right, defects can occur that will comprise the strength of the weld. Some of these defects are easily visible and others require sectioning or testing to tell if the weld is sound. Be careful not to assume a weld is strong based on how the surface looks; perform destructive tests on sample welds before you begin to ensure a good final weld.
In this article we give some of the more common defects that might be seen when welding plastics. To review proper welding technique please see our article: Using an Extrusion Welder. Repairing an object in the field adds several complexities to the welding process. Below are some tips to help you get a strong weld that will stand the test of time.
Have questions? Contact your Technical Sales Representative for help. Electrical Certification for use in Canada: Recognizing Certification and Why it’s Important9/23/2014
Electrical certification is a must for any electrical tools bought, sold, or used in Canada. Tools must be tested by an accredited certification organization to determine that they meet the applicable safety standards and adhere to the Canadian Electrical Code. The Standards Council of Canada handles the accreditation of inspection bodies and together with provincial Safety Authorities oversees enforcement.
Proper surface preparation is almost as important as technique when it comes to plastic welding. Improper preparation leads to weaker welds and can cause premature failures.
Welding area & weld rod must be:
The operation of individual extrusion welder is different, but below are some general tips for extrusion welding:
Avoid large temperature differences between components as it can cause considerable strain - for example, with a rise in temperature of 10°C a steel tube 10m in length will experience an expansion of 1.2 mm whereas a PE tube 10 m in length will experience an expansion of 34.0 mm. Welding speed depends on the output capacity of the extruder and the seam volume, some important things to remember are:
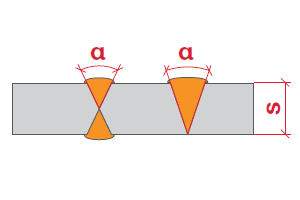
All hot air and extrusion joints need to have a root bead on the opposite side to avoid cracking and give more strength to the weld. It is necessary to weld into the welding root. Starting the weld: Before beginning the welding operation, the welding shoe must be warmed up, since a rough and uneven surface of the welded seam is obtained if welding is carried out with a cold welding shoe. The warm air available or the warm extrudate are suitable for warming up. Continuing the weld: Keep extruder perpendicular to weld surface. The welding shoe must be aligned centrally with the weld and must not come into contact with the weld edges around it’s nose. Weld cooling: The thermal contraction and the shrinking during cooling may cause residual stresses and even blowholes. Especially big extrusion welds of polypropylene tend to show shrink-induced blowholes in the center of the extrudate. In order to avoid this, the weld seam is covered with a special fabric after welding. The fabric must be sufficiently heat resistant. e.g. aramid (Kevlar).
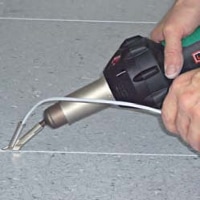
The use of speed welding tips on our hot air tools increases both the concentration of hot air and the amount of profile welding material that can be deposited in one pass. Generally, welding with this method results in welding speeds up to 15 times faster than pendulum welding. The welding process itself, as shown to the right, is the same as the pendulum method with the exception that the speed welding nozzle is used to guide the rod onto the welding joint.
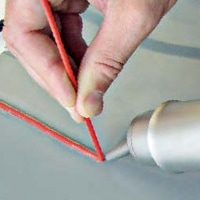
Starting the Weld: Insert the welding rod through the nozzle feeder until approx. 5 mm protrudes on the underside. Hold the tool so that the speed welding nozzle sole runs along the groove. The protruding rod must be held beyond the start of the “ V “ groove so that heat is directed on the start point for welding. When the surface plastic shows signs of slight “ Wetting” move the welding nozzle along the groove. Continuing the Weld: Once the weld has been properly started, the hot air blower is brought to a 45 degree angle and the rod will feed automatically without further help. With PVC pushing of the welding rod through the speed welding nozzle may be necessary. Wherever possible the weld should be completed in one continuous run along the groove.
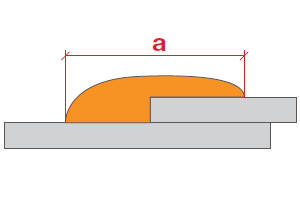
Good plastic welding practice requires three elements; proper temperature setting, consistent welding speed and even pressure on the welding rod. Using these three elements correctly will result in a slightly foam wash like appearance on the both edges of the weld which should result in good weld penetration and strength. The wash should not be brown or black as this indicates overheating
Starting the Weld: Hold the welding rod at the correct angle - 45 degrees for PE, PP for PVC 90 degrees to the base material. Continuing the Weld: Once the weld has been started the hot air should be fanned from the rod to the base material with approx. two full oscillations per second. Wherever possible the weld should be completed in one continuous run along the groove. |


|
STANMECH Technologies Inc.
944 Zelco Drive Burlington ON L7L 4Y3 | 1-888-438-6324 | info@stanmech.com Terms of Use Privacy Terms and Conditions of Sale Warranty Policies |
|
Proud Member of: